|
Building a Light Box
By Rod Bushfield
|
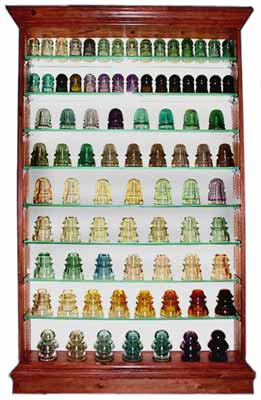
There are many reasons for building a light box, one of which is a chance to display your best glass in a "new" light. In my case I was tired at looking at my insulators on "klunky" wood shelves. Although I knew I would not be able to display all of my glass in a light box due to size constraints it was a chance to show off my best stuff, as well regain control of a living area with a nice piece of furniture. There are no doubt countless ways to build a light box and this is just one suggestion as I had good success on my first attempt.
First you should decide how big you would like it to be, what materials to use, as well as your budget. The one I will be discussing is 60" high, 36" wide and 12" deep. I wanted to use four foot fluorescent bulbs, as well as make it easy to move (fits easily through a door) should I decide to later. Smaller or bigger versions would be easily accomplished based on your specific needs.
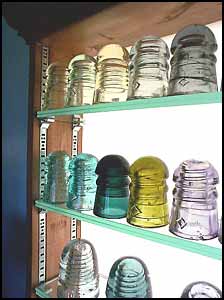
The majority of materials can be purchased at your local Home Depot or similar stores, with the exception of the glass shelving and Plexiglas diffuser. The cheapest part of the project was the wood construction materials. I chose 3/4" thick by 12" wide jointed pine that is designed for building shelving and cabinets. The advantage to this material is that it is already sanded and cut to precise dimensions, and is usually free from warpage. Oak was also considered for the project, however it is hard to find in 12" wide dimensions and will add to the cost of your project considerably. Pine was inexpensive, easy to work with , and readily available. The glass shelves and Plexiglas diffuser were purchased at a local glass and windshield shop. Because of the nearly 3 foot span, half inch thick glass was required. I ended up stacking two 1/4" thick shelves on top of each other, however a single piece of 1/2" glass would have been stronger. If I was to do this project over again I would have spent the extra money on a single piece of 1/2" glass. As it is now if I load too many heavy insulators on a shelf you can see the glass begin to deflect. Be Careful (especially if you intend to display expensive glass). The fluorescent lights are four feet long, each with their own ballast and a single bulb. I chose the bright white bulbs, however there are several other options including true color spectrum bulbs. To hold up the shelves I used four 60" shelf rails and associated clips cut to fit exactly inside the cabinet. This system allows you to be flexible at where you set the shelves. I ended up with a five inch spacing which gave me nine shelves including the bottom wood base. Here is a list of materials you will need. Again, this list will be different if you intend to make your cabinet to different dimensions.
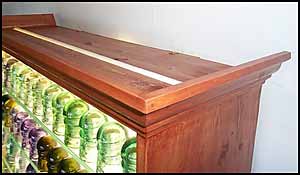
This will require some good woodworking skills and a table saw with a "dado" head or a router. The sides of the light box consist of two 60" tall sides with a 36" wide top and bottom. First cut the top into two pieces, 4 1/2" by 36" and 7" by 36". This will give you a slot to slide the Plexiglas in and out of. This top joint will be a "rabbit" joint and the bottom shelf will be a "dado" joint set 5" up from the bottom. When the four lights are installed this will give you a three inch clearance top and bottom which will eliminate any major dark areas. The lights are set 8" apart, mounted on the two 3" wide boards. These two boards are inset into the two side panels in a horizontal position at the back so the back of the cabinet will be flat to accept the back panel. Now a 3/8" wide slot is cut into both side panels so the Plexiglas can slide in and out. This slot will be 5 inches from the front edge of the cabinet.
 Four
recessed channels are now cut to accept the shelf supports (two on each side panel). This
will countersink the supports and give you a nice "clean" look. The channels are
set at 3/4" and 3 3/4" from the front edge of the cabinet. You should now be
able to assemble the basic cabinet. I used carpenters glue and finish nails, be sure to
check the cabinet is square before the glue dries.
Four
recessed channels are now cut to accept the shelf supports (two on each side panel). This
will countersink the supports and give you a nice "clean" look. The channels are
set at 3/4" and 3 3/4" from the front edge of the cabinet. You should now be
able to assemble the basic cabinet. I used carpenters glue and finish nails, be sure to
check the cabinet is square before the glue dries.
 You
should now be able to install the four lights and wire them to your cord. If you have
little or no wiring experience then please get a professional to do it. Cut some very thin
plywood to use as a back for the cabinet. This will be 36 1/4" wide by 57" tall.
I used small screws to attach it so I could remove it later if need be. Cut a one inch
hole in the bottom area for the cord to pass through and four one inch holes in the top
for ventilation. Paint the back and inside of the cabinet (up to the Plexiglas slot) with
glossy white paint as this will help eliminate hot and dark spots.
You
should now be able to install the four lights and wire them to your cord. If you have
little or no wiring experience then please get a professional to do it. Cut some very thin
plywood to use as a back for the cabinet. This will be 36 1/4" wide by 57" tall.
I used small screws to attach it so I could remove it later if need be. Cut a one inch
hole in the bottom area for the cord to pass through and four one inch holes in the top
for ventilation. Paint the back and inside of the cabinet (up to the Plexiglas slot) with
glossy white paint as this will help eliminate hot and dark spots.
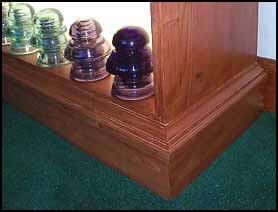 The
last 12" wide pine board is used to make the base. This piece as well as the crown
and other moldings are strictly used for eye appeal but are not necessary for structural
purposes. The above mentioned pine board is cut to 3 1/4" wide. You will need to cut
three of these strips out of the board and may need to glue a short piece on the longest
one to make it all the way across the front. The three pieces are cut and mitered to fit
around the base like a base board in your house and secured with nails and glue. The chair
and comer moldings are added in the same fashion. This is the most tricky part of the
project and could test your patience if you don't have a lot of experience. Measure twice
and cut once! A good power miter saw is helpful. The crown molding is added to the top in
a similar fashion. These last steps require the most skill, however I feel they are well
worth it as it will turn a boring shelf unit into a piece of furniture. It will also add
very little cost to the project. When installing the cabinet I used two "L"
brackets to secure it to the wall as a safety measure. Mine was installed on thick carpet
and seemed unsteady at first but the brackets cured that problem.
The
last 12" wide pine board is used to make the base. This piece as well as the crown
and other moldings are strictly used for eye appeal but are not necessary for structural
purposes. The above mentioned pine board is cut to 3 1/4" wide. You will need to cut
three of these strips out of the board and may need to glue a short piece on the longest
one to make it all the way across the front. The three pieces are cut and mitered to fit
around the base like a base board in your house and secured with nails and glue. The chair
and comer moldings are added in the same fashion. This is the most tricky part of the
project and could test your patience if you don't have a lot of experience. Measure twice
and cut once! A good power miter saw is helpful. The crown molding is added to the top in
a similar fashion. These last steps require the most skill, however I feel they are well
worth it as it will turn a boring shelf unit into a piece of furniture. It will also add
very little cost to the project. When installing the cabinet I used two "L"
brackets to secure it to the wall as a safety measure. Mine was installed on thick carpet
and seemed unsteady at first but the brackets cured that problem.
Hopefully this article has helped you in building your own light box. Although there is no way for me to walk you through this type of construction in a short article, I hope it has given you some ideas. As I said earlier there are many ways to build a light box. There are a few points I would like to add and things I would do differently. Firstly, the pine I chose was nice to work with but did not like to accept the red oak stain I picked. I've heard sealing the wood first will help prevent the stain from being blotchy. You could also try simply putting a clear coat over the natural wood color or painting it to match your decor. Secondly the cost of this project was much higher than expected. The majority of the cost was incurred by the glass shelves, Plexiglas sheet and four light units. Total cost for materials came to nearly $600 Canadian ($ 400 US) with me supplying the labor and tools free. It is a lot of money, but for me the results were worthwhile. It could possibly be done cheaper if you used second hand wood and light units but I think you would still have to purchase the Plexiglas sheet and glass shelves, because of the specific dimensions required. Lastly I used 40 watt bulbs which were the lowest I could find. When the cabinet is turned on it is slightly too bright to watch TV beside. Although the insulators look great, bear in mind it is bright. Any of you reading this who have further experience on this subject please feel free to use this Feedback Form and share your ideas and hopefully they can be added here for all collectors to read.
Happy Collecting!
Rod Bushfield
![]() Return
to the Taking Care of Your Insulators page
Return
to the Taking Care of Your Insulators page
If you have questions or comments, please use this Feedback Form.
Last updated Thursday, January 4, 2001