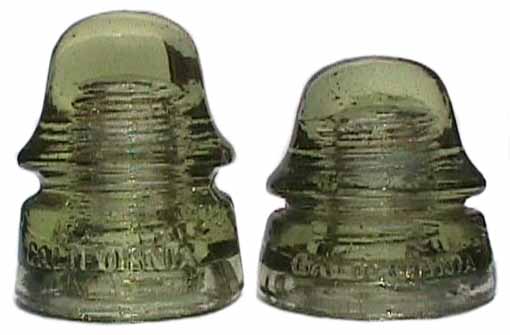
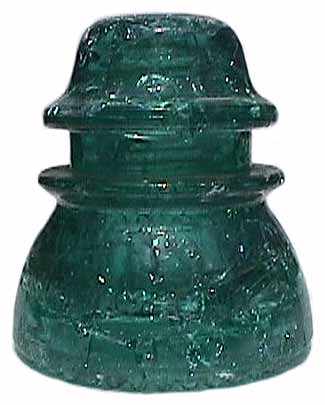
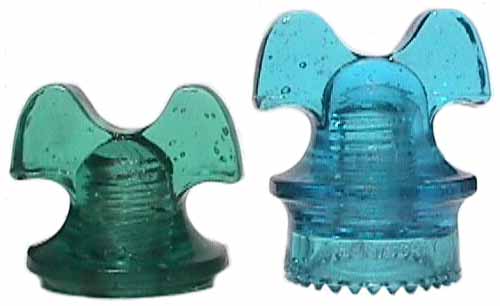
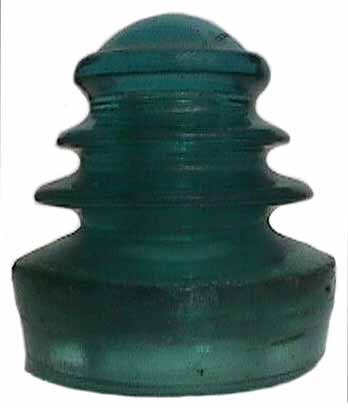
  These are both CD 162 California insulators. The one on the right displays the obvious signs of meltdown both in it’s squattiness and the flat, dull characteristics of both the skirt and petticoat. |
Using techniques similar to those described under "Heating" in Section 2, the actual shape of insulators has been modified by heating. Some pieces have even been represented as new or rare variations of existing CD numbers as a result of dimensions which have been intentionally altered by heating, either by shortening or by lengthening the piece. There are also quite a number of specimens that came from the factory with heat related distortions so it can be very hard to tell whether a heat distorted specimen is factory or altered. About the only reliable method to determine whether any piece has been "cooked" is through evidence of "meltdown". In the most severe case, the insulator will get so hot as to become shorter with bulging dome and skirt, pinched wire groove, etc. Under slightly lower temperatures, the entire structure of the insulator may be unaffected except, possibly, for the base. When an insulator is heated sufficiently to cause shape distortion, the surface of the insulator which rested in the kiln may develop a flatness with a very dull finish if it had been sitting on a flat surface such as a cookie sheet. Some specimens which were heated were sitting on a wire grid so telltale crosshatching may be an indicator of tampering. Many Maydwell insulators have this grid marking but it cannot be determined to a certainty that it is a factory feature or a post manufacture alteration. Both possibilities may be true. Almost all insulators with smooth bases were made with nicely rounded and glossy skirt edges. When a piece has a flat, dull skirt base, or a very coarse base surface, it is a good bet it has been reheated. Even pieces which have been manufactured with flat bases are still glossy rather than dull. Most pieces which were subjected to heating (especially California's and Denver's) came with rounded skirts so any noticeable flatness is a definite indication of tampering.
These are both CD 162 California insulators. The one on the right displays the obvious signs of meltdown both in it’s squattiness and the flat, dull characteristics of both the skirt and petticoat. |
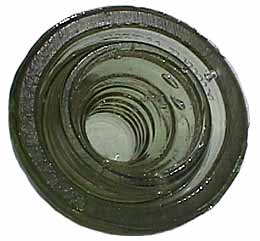
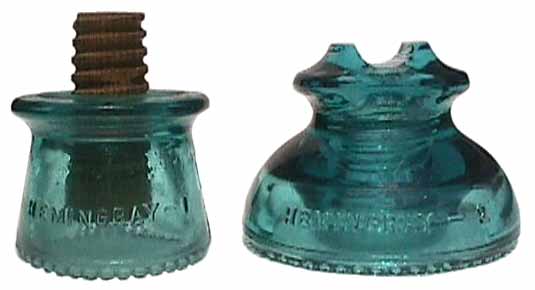
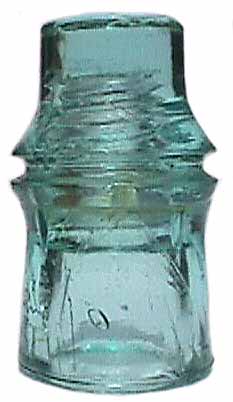
  This CD 122 Hemingray also shows the squattiness and flat base characteristics of meltdown. The corrugated base has nearly been obliterated by the flattening caused by heat. |
Some insulators have also been heated in an oven, then dropped into cold water to create a "crackled" effect. This causes virtual total damage to the piece yet specimens have been known to sell for very high prices.
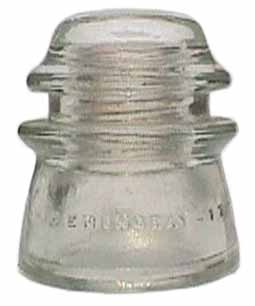
 This Hemingray 42 was crackled by heating and dousing in cold water. |
A final technique used to alter insulators using heat is to heat them to a temperature where their structures can be manipulated. Some unusual designs have resulted from this practice.
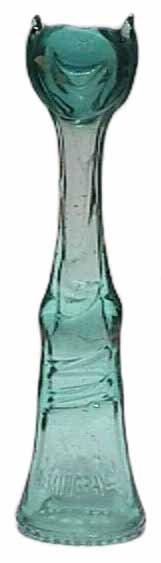 At one time, numbers of these pieces have been marketed as “Insulcats” They were made by heating in a kiln and then being stretched and manipulated into the shape seen here. |
The technique of grinding has been used both by the factory and by those who would alter an authentic insulator. The most obvious grinding of glass by a factory is seen in specimens manufactured by The California Glass Insulator Co. ("C.G.I.Co" and "CALIFORNIA" embossings.) The practice was used to remove glass burrs from mold over castings. The techniques were applied frequently to skirt edges and to the bases of the "egg" strain and Brown's pony/mine (CD 187) styles. On the other hand, grinding and polishing have been used by collectors to create a wide variety of new and different shaped pieces, to improve the appearance of damaged areas, and/or to remove or modify embossings. Specimens have been altered by grinding down exterior skirts, drip points and other features to make specimens different from or rarer than others. In addition to grinding, cutting off parts of the insulator or modifying the insulator by creating new features such as saddle grooves have also been tried. Polishing was done as a follow-up to cutting and grinding to remove and conceal the striations caused by the processes. Some polishing of insulators was also done in order to improve an undesirable surface condition such as sandblasting or etching.
  After removing the skirt and lots of grinding and polishing of a CD 288 (left) the "rocketship" on the right was produced. |
 This CD 257 has had the bottom of the skirt cut off and polished giving it a substantially different appearance than it’s intact cousin. |
 The color of this CD 113 is authentic but the “Star” embossing has been ground off and polished leaving the appearance that the piece is unembossed, making it an unlisted specimen. |
 This piece is a CD 121 Hemingray which has had a saddle groove ground into the dome and polished. This style never had such a saddle groove. |
 This piece once was a CD 317 which has had the lower half cut off and the base polished. To those who had never seen a complete specimen, this could easily be construed as a complete insulator. |
  In the early days of the hobby a CD 121 Hemingray was cut off at the lower wire groove and a factory CD 241 was attached to the top by way of a short pin. The pair was referred to as a “Baby Muncie” as it bore resemblance to a CD 303/310 combination. |
 This piece was once a CD 283 which has had the outer skirt removed and ground. It can be easily identified by the dull finish and many striation marks described above. A layer of lacquer used to give a glossy finish to the ground area has discolored providing yet another tip to it’s altered nature. |
Besides intimate familiarity with known CD styles, there are two primary detection techniques for ground and polished specimens; 1) the presence of striations or contour disruptions; and, 2) dull finishes. It is extremely difficult to grind and polish glass to a degree which is undetectable. Most ground spots have the striations (lines) which are typical of any ground surface. Grinding also tends to leave a flat spot or series of adjacent flat spots since the grinding wheel is usually flat itself. When any such striations or flat spots are present, it is time to get suspicious. When an embossing is removed and the area where it would normally have been present is highly polished, the altered area often does not conform with the contour of the rest of the insulator and is sometimes not as glossy. Close examination may also show very fine striations where the polishing wheel was applied. A slight depression may also exist where the embossing once was. Sometimes, however, resin or lacquer was used over the ground area to disguise the removal. Glass is very difficult to polish to the degree of the molded item. If you have a specimen which has a slight dullness where it should be glossy and embossed, it may have been altered by grinding and polishing.
In the case of repaired pieces, cutting and regluing were done to create a presentable specimen out of two damaged ones of the same CD, color, and manufacturer. Using the same techniques, a number of creative new specimens were created by using tops to one CD or Brand and bottoms to yet another resulting in a "hybrid" specimen of two different CD's, brands, colors, etc. These are frequently amusing, unusual, and interesting but are nonetheless to be on the lookout for. Many are so expertly done as to defy easy detection thereby giving the impression of being a new style. The identification of such altered pieces is easily achieved with a thorough knowledge of existing CD styles. Without such knowledge, use of the techniques described under "Reglue Detection" in Section 1 should assist in the detection of this type of alteration.
 This “hybrid” specimen has the top to a CD 162 glued to the base of a CD 145 H. G. CO. |
 This second hybrid is the opposite of the previous piece. This is the top of the CD 145 glued to the base of the CD 162. |
 This piece has the top to a CD 128 glued to the bottom two thirds of a CD 203 Hemingray. |
 This interesting hybrid has fooled quite a few collectors. It consists of the top of a CD 130 Cal. Elec. Works glued to a base from a CD 121 unembossed Duquesne with the four vertical ribs. |
 The piece on the left is a legitimate CD 210 Postal insulator. The piece on the right was made by gluing the top of one 210 to the base of another thus adding additional height. |
Occasionally, some pieces will show up which have a sandblasted or grainy texture. While there were a few such specimens with odd surfaces created on an experimental level at Whitall-Tatum/Armstrong, all other such pieces are generally believed to have been either naturally or artificially sandblasted to create an unusual surface. These pieces are essentially damaged and should be valued accordingly.
 This CD 143 Canadian Pacific has been so severely and uniformly sandblasted that the entire surface is a lusterless rough finish. |
There are a few authentic specimens with exterior shapes in both threaded and unthreaded styles (e.g. 133 & 728.4). To enhance the value of the threaded types (or to create "new" specimens altogether) some persons have removed the threads utilizing a boring device and subsequently attempted to polish the remaining smooth hole. The most reliable method of detection is to look for the same telltale signs as described under "Grinding/Polishing", above, as well as to be educated on the known threadless styles. Specimens which have been altered with this technique generally have larger pinholes than a normal threadless and do not have the typical pinhole taper of authentic pieces.
Section 2 |
Section 4 |