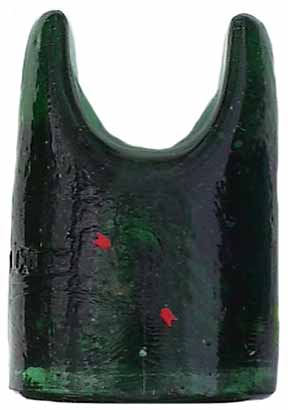
 CD 267.5 with potstone fracture between arrows. |
One of the most common alterations to insulators is the practice of repairing damage. Repairs are not inherently fraudulent unless their presence is misrepresented by a seller. In many cases, artful repair greatly enhances both the appearance and value of a piece even when it is known to have been repaired.
Repairs generally take one or more of three forms: 1) Regluing separated pieces; 2) Reconstructing missing/damaged portions; and 3) the concealment of cracks with liquid compounds.
Just about anywhere there is a fracture line completely through an insulator there is the possibility of a reglue repair (or at least the potential need for one.) In a carefully reglued piece the repair may be virtually undetectable. Some of the things to look for in a reglued specimen are:
1) Discoloration. Some adhesives are less than clear when applied while others may discolor with time after application. Look for discoloration in or about the fracture seam. Not all discoloration, however, is attributable to gluing. Occasionally water may seep into fractures, especially in specimens which have been buried, causing discoloration due to minerals dissolved in the water. This may give the appearance of a repair where none actually exists. There are new glue compounds now available which are virtually invisible to the naked eye. Some repairs using such materials will be apparent upon the application of ultraviolet (UV) light sources. Different results may be obtained depending upon the wave length of the light source. Also, care must be taken when using UV light as it can cause eye damage under improper exposure conditions.
2) Glue Residues. If you can see a fracture line feel the line (carefully!). Some glue may remain in the form of a bead rising above and/or below the fracture seam, especially on the surfaces on the interior of the piece. There may also be some smearing or other evidence of dried glue where the glue bead surfaced during compression of the two pieces and was either wiped off or smoothed out.
3) Cuts and Reattachments. Occasionally, parts of two different damaged specimens have been combined to form a more presentable piece. This is accomplished by making horizontal cuts at the same place on each piece and gluing the best top to the best bottom. While an admittedly tricky process, when done properly it can be virtually indiscernible. Look for the same symptoms as above and pay close attention to areas which most easily disguise the cut such as mold lines, wire grooves, the surface immediately below protruding skirts, etc. There may also be a difference in the diameter of the two halves if the cut was not made precisely. Glue lines, color differentials between the halves, mismatched mold lines and misaligned threads are other clues to pieces joined by this process.
4) Vacuum Glue Process. Some reports have been received where a vacuum process has been used to repair insulators. When successful, the adhesive filler reportedly completely fills any cracks and is extremely difficult to detect. Such repairs may be detectable by examining the insulator under light (see Fracture Reflection, below) or by using a UV light source (see paragraph 6, below.)
5) Fracture Reflection. It is always recommended that you examine specimens carefully before buying to make sure there are no hidden fractures, some of which are very difficult to detect. In dark glass particularly, fractures reflect light when exposed to a bright light source. Hold the piece under bright light and rotate at all possible angles to see if there is a reflection attributable to a fracture. Newer halogen and similarly high intensity flashlights are bright enough to be very effective in this process.
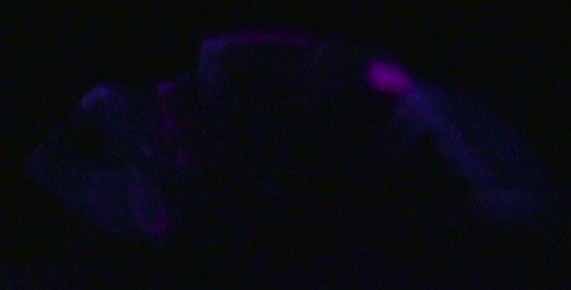
6) UV Light (blacklight) Usage.Certain wavelengths of UV light may be useful in detecting regluing and reconstruction efforts. As with other suggested techniques of repair detection, UV light is not infallible. Certain repairs will not be revealed with this technique. Because of its ease of use, the most effective UV light source is probably a portable unit with both low and high wavelength tubes. The more intense the light emitted by the unit the better but with higher intensity there is greater cost. Using UV light requires darkness so some type of portable viewing chamber would be required along with the light source. This could be as simple as an opaque trash bag. Under either low or high wavelength UV light sources, insulator repairs may fluoresce vividly in contrast to the rest of the insulator. In the photo below, a pot stone bruise caused the separation of a circular piece of glass which was subsequently reglued. While such bruises are readily visible to the naked eye, only after UV is applied can it be determined that the piece has been reglued. Caution is always recommended when using this technique as improper exposure to UV light may cause eye damage.
CD 267.5 with potstone fracture between arrows. |
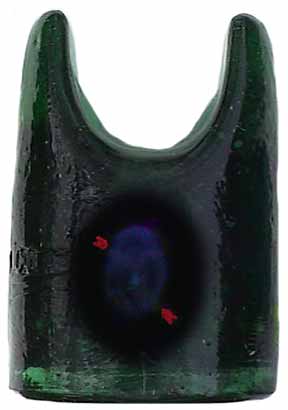 Same piece under UV showing fluorescence due to adhesive. |
In many pieces, especially those with very dark colors, high quality reconstructive repairs are all but undetectable, even upon the closest scrutiny. In some cases, high intensity or UV light, magnifying glasses, etc. may be helpful. Some general guidelines to assist with the identification of reconstruction repairs follow.
1) Weight. If you lift a piece and it feels like it's made of plastic, it just might be! Pieces with major reconstruction are frequently significantly lighter than expected as the weight and density of the repair material is much less than glass. If it doesn't feel "right", inspect closely and ask questions.
2) Surface Texture and Detail. In all but the best reconstructive efforts, the texture of the repair area will differ from the surrounding original glass. Look for smooth spots on a normally rough glass surface and check for rough spots next to smooth ones. Repairs of newer pieces often do not reflect the same contour or smoothness of the molded glass. In fact, the repair may be somewhat "dimpled" compared to the adjoining glass. The detail of a repaired surface such as embossings, mold lines, etc. may not be consistent with the molded area. Detail on the inside of the piece, especially petticoats, drip points, and threads, are often deficient when compared with the original item. There are many examples of repairs of embossings so just because an embossing looks good doesn’t mean a piece hasn’t been repaired in the embossed areas.
3) Sound. If you tap (carefully !) a suspected area of reconstruction with a hard, solid object (like a nail) it will frequently have a different tone than the glass. While it does not work in every case, it does have some utility.
4) Discoloration. In lighter colored insulators one of the easiest methods to identify a reconstructed area is through discoloration of the filler material. Exact color matches are very difficult to begin with and even if the match was close at the time of the repair, many filler compounds fade, yellow or otherwise change color with time. If an insulator has any surface which is a different shade than the body, it could quite possibly be a repair.
 This piece has a small portion of glass (upper right) and the rest is plastic. It demonstrates rather radically the discoloration between resin and glass which can occur. |
5) Ultraviolet Light. Examination of reconstructed insulators under ultraviolet light may cause the repaired area to fluoresce when the surrounding glass does not.
 Two of the top three turrets in this castle have been reconstructed with resin but it is nearly impossible to tell with the naked eye. |
 Under UV light, the resin repairs fluoresce showing where the reconstruction has taken place. |
Repair Coatings And Tumbling
Under a variety of conditions such as burial of the insulator or exposure to blowing sand, the surface of an insulator can become etched (swirled streaks or "rainbow" caused by dissolution of the glass surface by dissolved ground minerals) or sandblasted (dull, frosted look.) Many different techniques have been used to cover or remove this "damage".
1) Oils and Wax Compounds. Perhaps the most common treatment is the use of "Endust" or similar wax/cleaner compounds. Applied to the surface of frosted or etched insulators, waxes and oils may provide temporary visual relief of the problem by giving a glossy finish similar to the original glass. A thorough bath in detergent or light acid will reveal the true character of the piece almost instantly. When you handle such a piece, it's surface frequently has the feel of oil or wax and may even smell like the compound used. If it feels slick and oily, get suspicious.
2) Polyurethane, Lacquer, and other Finishes. A much more difficult technique to detect is the application of transparent lacquers, polyurethane, fingernail polish, and similar materials. When skillfully applied, such surfaces are most difficult to detect. Some clues to look for include:
 This pony developed a very frosted appearance which is visible on the right half. The left half was coated with clear fingernail polish giving it a factory shiny appearance. |
3) Tumbling. The practice of tumbling insulators has gained popularity in recent years. Bottle collectors have been doing it for a long time using practices similar to those used to polish rocks. Tumbling essentially restores surface luster to glass by mechanically polishing the outer layers to remove light scratches, burial stain, etching, etc. Short of microscopic examination, it is difficult to identify tumbled pieces unless they’ve been tumbled too long. In such cases, the embossing may be smooth instead of sharp and other edges which are normally rough or sharp may show signs of polishing. There are differences of opinion about the ethics of tumbling but currently it is accepted more as a cleaning technique than an alteration.
Certain specimens with etching or sandblasting may be subjected to acid treatment utilizing hydrofluoric acid which actually dissolves the glass. This is used to actually remove the damaged surface of the glass to try to restore surface luster. The practice has also been used to remove carnival glass coatings to create clear glass specimens which were not actually used in the field in that color. There is no known detection technique for acid dipping. This process is extremely dangerous as this acid is one of the most hazardous to handle and its use is strongly discouraged. With the increased accessibility of tumblers, this practice is in decline.
Introduction |
Section 2 |